Refrigerator compressor not starting? If your fridge has power and the lights work but the compressor won’t run, don’t panic—this is a common issue with several possible causes.
In this guide, you’ll learn how to diagnose the problem, test the compressor and start components with a multimeter, and determine whether a simple part replacement or professional service is required. This applies to top-freezer, bottom-freezer, and side-by-side refrigerators.

Refrigerator Compressor Not Starting? Common Symptoms
- The fans are running, but the compressor is warm: likely an issue with the compressor or start components.
- No fans running: possible fault with the cold control, defrost thermostat, or control board.
How a Refrigerator Compressor Works
All refrigerators operate on the same principle:
- The cold control sends power to the cooling circuit.
- The compressor circulates refrigerant through the system.
- Heat is absorbed in the evaporator coils (inside the freezer) and released through the condenser coils (at the back).
- The cycle repeats until the set temperature is reached.
The compressor uses a single-phase motor with:
- Start winding & run winding (connected to a common terminal)
- Overload protector (disconnects power if overheating)
- Start relay and/or capacitor (provides torque to start the motor)
Tools You’ll Need
- Screwdriver or nut driver
- Adjustable wrench (if disconnecting water line)
- Multimeter (for continuity, resistance, or capacitance tests)
- Cut-resistant gloves
- Insulated screwdriver or resistor (to safely discharge capacitors)
Step 1: Access the Components
- Slide the fridge away from the wall and unplug it.
- Shut off the water supply and disconnect the line if necessary.
- Remove the rear access panel with a 1/4-inch nut driver.
Step 2: Test the Compressor
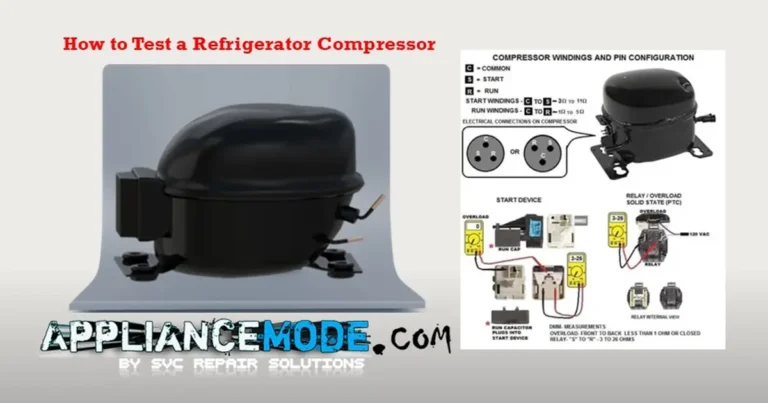
- Locate the three terminals: Common, Start, and Run.
- Use a multimeter (ohms setting) to check resistance:
- Start + Run ≈ 10Ω
- Start + Common ≈ 6Ω
- Run + Common ≈ 4Ω
- If no resistance is detected, the compressor has failed.
- Also test for shorts between terminals and ground (copper pipe or ground wire).
⚠️ If the compressor fails testing, you’ll need a licensed technician. The sealed system contains refrigerant and requires specialized tools.
Step 3: Test the Start Components
Overload Protector
- Should show continuity (0–1 Ω).
- No reading → replace.
Start Relay (PTC Thermistor or Current Relay)
- Test resistance between R and S terminals (3–12 Ω typical).
- No continuity or extreme readings → replace.
Capacitor
- Check capacitance with a multimeter.
- Reading must be within 10% of the rated value.
- Out of range → replace it.
Inverter Control Board (Some Models)
- Variable speed compressors use an inverter board instead of relays.
- These cannot be easily tested; eliminate all other faults before replacing.
Step 4: Reassemble and Restore Power
- Reconnect the start relay, capacitor, and overload protector.
- Reattach wires and retaining clips.
- Reinstall the back panel and water line.
- Plug in the refrigerator and slide it back into place (leave at least 2″ clearance for airflow).
When to Call a Professional
If tests confirm the compressor itself is defective, contact a certified technician. Attempting DIY repair on sealed refrigeration systems can be dangerous and may void warranties.
✅ With these steps, you’ll be able to identify whether the issue is a bad relay, faulty capacitor, or a failed compressor. In many cases, replacing the start components solves the problem without costly repairs.
For more detailed appliance repair guides, visit ApplianceMode.com.
Summary Table: 8 Expert Tips to Fix a Refrigerator Compressor That Won’t Start Fast
| Step | Component / Check | Tool Needed | Expected Result | Action if Failed |
|---|---|---|---|---|
| 1 | Power & Fans | Visual check | Lights on, fans running | If no fans → check control board |
| 2 | Compressor Resistance | Multimeter | ~10Ω (Start+Run), ~6Ω (Start+Common), ~4Ω (Run+Common) | Replace compressor (tech required) if no continuity |
| 3 | Compressor to Ground Test | Multimeter | No resistance between terminals & ground | If resistance found → compressor shorted |
| 4 | Overload Protector | Multimeter | 0–1Ω continuity | Replace overload protector |
| 5 | Start Relay (PTC Thermistor) | Multimeter | 3–12Ω resistance at room temp | Replace relay if no reading or extreme |
| 6 | Capacitor | Multimeter (capacitance setting) | Within ±10% of rated value | Replace capacitor if out of range |
| 7 | Inverter Control Board | Visual check | No visible damage, board intact | Replace if all other parts test good |
| 8 | Final Assembly | Visual check | All wires secured, panel reinstalled | Test fridge for normal operation |

I am a master Appliance Repair technician with over 35 years of experience in the field. I am passionate about helping people troubleshoot their appliances and fix common problems. My website, appliancemode.com, provides a wealth of information on troubleshooting common appliance issues and deciphering error codes. This website aims to empower people to tackle appliance repairs themselves and save money on service calls.


