Samsung Top-Mount Freezer Refrigerator Error Codes
If your Samsung top-mount freezer refrigerator is displaying flashing LEDs, blinking error indicators, or unusual light patterns on the control panel, main control board, or inverter board, it’s trying to tell you that something isn’t working correctly. These built-in diagnostic codes help pinpoint faults within the refrigerator’s cooling, defrost, sensor, fan, or communication systems.

Understanding what these error codes mean can save you time, prevent unnecessary part replacements, and help you determine whether the issue is a simple fix or requires professional service.
How Samsung Refrigerator Error Codes Work
Unlike many modern refrigerators that display alphanumeric error codes directly on the front panel, some Samsung top-mount models use combinations of flashing LEDs to indicate specific failures. These indicators may appear:
- On the display panel
- On the main control board
- On the inverter board
- During diagnostic or self-test mode
Each blinking pattern corresponds to a particular component or system that has failed or is operating outside normal parameters.
Before You Begin Troubleshooting
Safety should always come first when servicing any refrigerator.
Before inspecting or testing components:
- Unplug the refrigerator from the power outlet.
- Wear appropriate safety equipment.
- Use caution around sharp metal edges.
- Avoid working on energized electrical circuits.
- Allow moving components such as fans to stop completely before inspection.
If electrical testing is required, use a properly rated digital multimeter and follow all manufacturer safety recommendations.
Locating the Warning LED on Samsung Refrigerators
Many Samsung top-mount refrigerators use diagnostic LEDs on the main control board and inverter board to indicate faults. When a problem occurs, these LEDs flash in a specific pattern that can help identify the failed component or system.
Before troubleshooting, you’ll need to locate the diagnostic LED.
Step 1: Locate the Main Control Board and Inverter Board
The refrigerator’s electronic control boards are typically mounted behind a protective metal cover on the rear of the appliance.
Depending on the model, you may find the following:
- Main Control Board (PCB) – Controls refrigerator operation, sensors, fans, and defrost functions.
- Inverter Board – Controls the compressor’s speed and operation.
Step 2: Remove the Rear Access Panel
To access the boards:
- Unplug the refrigerator from the power outlet.
- Pull the refrigerator away from the wall.
- Remove the screws securing the lower rear access panel.
- Carefully remove the panel to expose the electronic components.
Safety Warning: Always disconnect power before removing panels or handling electrical components.
Step 3: Find the Diagnostic LED
Look for a small LED indicator on either the
- Main control board
- Inverter board
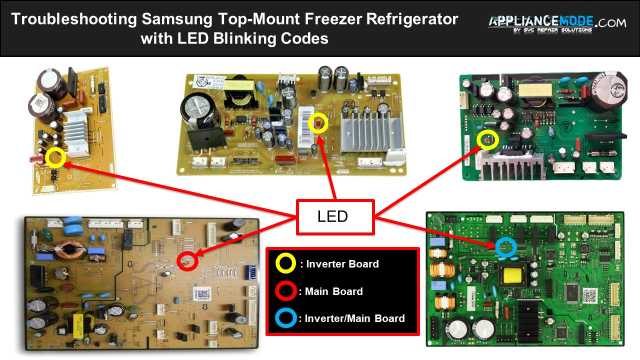
The LED is typically red, orange, or green and may be labeled STATUS, ERROR, LED, or DIAG depending on the model.
How to Read the Blinking Error Code
Once you’ve located the diagnostic LED, you can determine the fault by counting the number of flashes.
Observe the Blink Sequence
Restore power to the refrigerator and watch the LED carefully.
The LED will flash in a repeating pattern:
- Count the number of consecutive blinks.
- Wait for the pause.
- Confirm the pattern repeats consistently.
For example:
- Blink → Pause → Blink → Pause = 1 Flash Error
- Blink Blink Blink → Pause → Repeat = 3 Flash Error
- Blink Blink Blink Blink Blink → Pause → Repeat = 5 Flash Error
Match the Blink Count to the Error Code
Each blink pattern corresponds to a specific fault condition, such as the following:
- Defrost system failure
- Fan motor error
- Temperature sensor malfunction
- Compressor communication problem
- Inverter board failure
- Main control board fault
Refer to the error code chart for your specific Samsung refrigerator model to determine the exact cause.
Samsung Top-Mount Freezer Refrigerator Error Codes and Troubleshooting
Here is a breakdown of common error codes indicated by the main board LED, along with potential causes and troubleshooting steps:
Main Board LED Blinking Patterns:
1 Blink: Freezer Sensor Error (-19°C flashing)
- Issue: Indicates a problem with the freezer temperature sensor.
- Troubleshooting:
- Check the wire harness and connector for the freezer sensor for any disconnections or damage.
- Test the resistance of the freezer sensor using a multimeter. Refer to your refrigerator’s service manual or reliable online resources for the specific resistance value at a given temperature (e.g., approximately 16420 Ω at -5°C/23°F).
- If the sensor shows open or shorted circuits, replace it.
- If the error persists after checking/replacing the sensor, the main PCB may be faulty and require replacement.
2 Blinks: Freezer Defrost Sensor Error (-15°C flashing)
- Issue: Indicates a problem with the freezer defrost sensor.
- Troubleshooting:
- Inspect the wire harness and connector for the freezer defrost sensor.
- Measure the resistance of the freezer defrost sensor with a multimeter. Consult your service manual or online resources for the correct resistance value (e.g., approximately 20420 Ω at -10°C/14°F).
- Replace the sensor if it has shorted or open circuits.
- If the error continues, the main PCB might need to be replaced.
3 Blinks: Ambient Sensor Error (-21°C flashing)
- Issue: Indicates a problem with the ambient temperature sensor.
- Troubleshooting:
- Check the wire harness and connector connected to the ambient sensor.
- Test the resistance of the ambient sensor using a multimeter. Look up the expected resistance value for your model (e.g., approximately 5000 Ω at 25°C/77°F).
- If the sensor’s resistance is outside the normal range (shorted or open), replace it.
- If replacing the sensor doesn’t fix the error, the main PCB could be the issue.
4 Blinks: Freezer Dial Switch Error
- Issue: Indicates a problem with the freezer temperature dial switch.
- Troubleshooting:
- Examine the wire harness and connector for the freezer dial switch.
- Check the resistance of the freezer dial switch at different positions using a multimeter. Refer to your service manual for the expected resistance values for each setting (e.g., ~2100 Ω at position 1, ~10000 Ω at position 5).
- Replace the dial switch if the resistance readings are incorrect.
- If the error persists, the main PCB may need replacement.
5 Blinks: Freezer Defrost Error (-23°C flashing)
- Issue: Indicates a problem within the freezer defrost system. This is a more general error and could be caused by several components.
- Troubleshooting:
- Check the wire harness and connector for the freezer defrost heater for continuity and proper connection.
- Measure the resistance of the freezer defrost heater. Expected values vary by voltage (e.g., ~390 Ω @ 220 Vac / ~100 Ω @ 110 Vac). An abnormal reading (very low or infinite) indicates a faulty heater.
- Test the thermal fuse for continuity. It should read as a closed circuit (very low resistance). If it reads open (infinite resistance), the fuse is blown and needs replacement.
- Check the resistance of the bimetal thermostat. It should read closed (low resistance) at approximately 40°C/104°F and open (infinite resistance) at approximately 60°C/140°F.
- Replace any defective components based on your readings.
- If all components test fine and the error persists, the main PCB might be the problem.
6 Blinks: Fridge Sensor Error (-17°C flashing)
- Issue: Indicates a problem with the refrigerator compartment temperature sensor.
- Troubleshooting:
- Inspect the wire harness and connector for the fridge sensor.
- Measure the resistance of the fridge sensor. Consult your service manual for the correct resistance value (e.g., approximately 10820 Ω at 5°C/41°F).
- Replace the sensor if it has shorted or open circuits.
- If the error persists, the main PCB might need to be replaced.
9 Blinks: Fridge Dial Switch Error
- Issue: Indicates a problem with the refrigerator temperature dial switch.
- Troubleshooting:
- Examine the wire harness and connector for the fridge dial switch.
- Check the resistance of the fridge dial switch at different positions using a multimeter. Refer to your service manual for the expected resistance values for each setting (e.g., ~4200 Ω at position 2, ~10800 Ω at position 6).
- Replace the dial switch if the resistance readings are incorrect.
- If the error persists, the main PCB may need replacement.
10 Blinks: Inverter Compressor Error (Also check Inverter Board LED)
- Issue: Indicates a problem with the inverter compressor system. This error often coincides with specific blink patterns on the inverter board.
- Troubleshooting: Refer to the inverter board LED patterns below for a more specific diagnosis of the compressor issue. Troubleshooting steps will depend on the inverter board code but generally involve checking compressor connections and voltage and potentially replacing the inverter board or compressor.
11 Blinks: Freezer Fan Motor Error (1°C flashing)
- Issue: Indicates a problem with the freezer fan motor.
- Troubleshooting:
- Check the wire harness and connector for the freezer fan motor.
- Verify the voltage supplied to the freezer fan motor. Consult your service manual for the expected voltage (often around 10.3 Vdc main voltage and 2.2 Vdc feedback voltage).
- If the motor is not receiving the correct voltage or is not spinning freely, it may need to be replaced.
- If replacing the fan doesn’t resolve the issue, the main PCB could be faulty.
12 Blinks: Fridge Fan Motor Error (7°C flashing)
- Issue: Indicates a problem with the refrigerator compartment fan motor.
- Troubleshooting:
- Inspect the wire harness and connector for the fridge fan motor.
- Check the voltage supplied to the fridge fan motor. Refer to your service manual for the expected voltage (often around 10.3 Vdc main voltage and 2.2 Vdc feedback voltage).
- If the motor is not receiving power or is not operating correctly, it may need replacement.
- If the error persists, the main PCB might be the cause.
13 Blinks: Ice Maker Error (Ice On/Off icon flashing)
- Issue: Indicates a problem with the ice maker assembly or its related components.
- Troubleshooting:
- Check the ice maker wire harness and connectors for proper connection and damage.
- Test the resistance of the ice maker’s water pipe heater (if applicable to your model). An expected resistance is around 60 Ω.
- Check the resistance of the ice maker sensor (if applicable). An expected resistance is around 5000 Ω at 25°C/77°F.
- Inspect the ice maker assembly for any visible issues or obstructions.
- Replace any faulty components found.
- If the error persists, the main PCB may be the culprit.
14 Blinks: Compressor Communication Error
- Issue: Indicates a loss of communication between the main PCB and the inverter board.
- Troubleshooting:
- Check the wire harness and connectors that link the main PCB and the inverter board for any loose connections or damage.
- If the connections are secure, either the main PCB or the inverter board may be defective and require replacement.
17 Blinks: Condenser Fan Motor Error (2°C flashing)
- Issue: Indicates a problem with the condenser fan motor.
- Troubleshooting:
- Examine the wire harness and connector for the condenser fan motor.
- Verify the voltage supplied to the condenser fan motor. Consult your service manual for the expected voltage (often around 10.3 Vdc main voltage and 2.2 Vdc feedback voltage).
- Replace the condenser fan if it’s not operating correctly.
- If the error continues, the main PCB might be faulty.
Errors with other flashing indicators:
4°C flashing LED: Deodorizer Fan Motor Error
- Issue: Indicates a problem with the deodorizer fan motor.
- Troubleshooting:
- Check the wire harness and connector for the deodorizer fan motor.
- Verify the voltage supplied to the deodorizer fan motor (often around 10.3 Vdc main voltage and 2.2 Vdc feedback voltage).
- Replace the deodorizer fan if necessary.
- If the error persists, the main PCB might need replacement.
Quick Cool icon flashing LED: Flex Damper Heater Error
- Issue: Indicates a problem with the flex damper heater.
- Troubleshooting:
- Inspect the wire harness and connector for the flex damper heater.
- Check the resistance of the flex damper heater (expected value around 135 Ω). An abnormal reading indicates a faulty heater.
- Replace the flex damper if the heater is defective.
- If the error persists, the main PCB may need replacement.
Meat/Fish icon flashing LED: Flex Sensor Error
- Issue: Indicates a problem with the flex sensor.
- Troubleshooting:
- Check the wire harness and connector for the flex sensor.
- Measure the resistance of the flex sensor (e.g., approximately 10820 Ω at 5°C/41°F).
- Replace the flex sensor if it has shorted or open circuits.
- If the error continues, the main PCB might be the issue.
Inverter Board LED Blinking Patterns (Often seen with Main Board 10 Blinks)
The inverter board LED provides more specific information about compressor-related errors:
- 1 Blink: Compressor starting failure.
- 2 Blinks: Compressor IPM (Intelligent Power Module) failure.
- 3 Blinks: Compressor location detection problem.
- 4 Blinks: Compressor motor constraint problem.
- 5 Blinks: Compressor low-voltage problem.
- 6 Blinks: Compressor high-voltage problem.
For inverter board errors, troubleshooting often involves checking the power supply to the refrigerator, inspecting wiring connections to the inverter board and compressor, and potentially replacing the inverter board or the compressor itself.
Samsung Top-Mount Freezer Refrigerator Self-Diagnosis Mode
Many Samsung refrigerators have a self-diagnosis mode that can help confirm if an error is present.
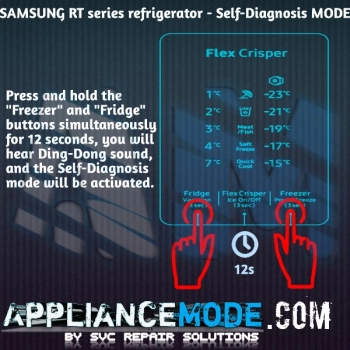
How to activate self-diagnosis:
Press and hold the “Freezer” and “Fridge” buttons simultaneously for 12–13 seconds. You should hear a “dingdong” sound confirming entry into self-diagnosis mode.
In self-diagnosis mode:
- All LEDs will initially turn off.
- If there are no errors, the temperature LED (“XX°C”) on the control panel will return to the normal temperature display after 12–13 seconds.
- If an error is detected, the temperature LED (“XX°C”) on the control panel will blink or flash, accompanied by a “dingdong” sound. The error code will typically display for 1 minute before the refrigerator returns to normal operation.
Note: For models with an ice maker, the ice On/Off icon flashing during self-diagnosis only indicates an error if an ice maker is actually installed.
How to exit self-diagnosis mode:
- If an error is present, the mode automatically exits after one minute.
- If no error is present, the mode automatically exits after 12 seconds.
- You can manually exit by pressing and holding the “Freezer” and “Fridge” buttons simultaneously for 12 seconds.
- Unplugging the refrigerator will also exit self-diagnosis mode.
Final Thoughts
Samsung top-mount freezer refrigerators use sophisticated self-diagnostic systems to identify problems before they become major failures. Whether the refrigerator is displaying flashing LEDs on the control panel, main board, or inverter board, these indicators provide valuable clues about the source of the problem.

I am a master appliance repair technician with over 35 years of experience in the field. I am passionate about helping people troubleshoot their appliances and fix common problems. My website, appliancemode.com, provides a wealth of information on troubleshooting common appliance issues and deciphering error codes. This website aims to empower people to tackle appliance repairs themselves and save money on service calls.