

Smeg 50’s Style Blenders Troubleshooting
The content of Smeg 50’s Style blenders troubleshooting is provided to assist you in understanding the operation, identifying the pinpoint failures of the appliance, and performing disassembly operations.

Smeg 50’s Style blenders Troubleshooting
Remember to always unplug the appliance and exercise caution when attempting any repairs.
The appliance does not switch on
Causes:
- The power cord is not inserted.
- START-STOP button is not pressed.
- START-STOP button is not working.
Solutions:
- Check the output AC power supply and ensure that 220 volts are present at the connector.
- Insert the plug.
- Press the button to start the appliance.
The appliance does not start
Causes:
- The motor overheated.
- The plug is not properly inserted in the socket.
- The cable is faulty.
- Power failure.
- The jug is not correctly inserted in the housing.
Solutions:
- Disconnect the electric power and allow the motor to cool down.
- Insert the plug into the power socket.
- Do not use adapters or extension cables.
- Check that the main switch is on.
- Check and replace, if necessary, the power cable.
- Check the home network power supply.
- Remove the jug and insert it correctly into its base.
The appliance vibrates
Causes:
- The appliance is not placed on a stable surface.
- The anti-slip rubber feet are worn out.
- Too high a speed has been set, or the load is too heavy.
Solutions:
- Put the appliance on a stable and flat surface.
- Replace the anti-slip rubber feet.
- Set a lower speed and check that you have not overloaded the jug.
The appliance is leaking
Causes:
- The jug is too full.
- The lid was not inserted or defective.
Solutions:
- Do not exceed the maximum capacity (1.5 liters/6 cups).
- Check the cover, and replace it if necessary.
When the blender jug is almost or completely full (1.5 liters), it is recommended to place one hand on the blender lid to prevent it from moving during operation.
The appliance turns on, but the blades do not turn
Cause:
- The jug was not correctly inserted in the housing.
Solution:
- Remove the jug and insert it correctly into its base.
The appliance stops during operation
Cause:
- The motor overheated.
Solution:
- Disconnect from the power supply and let the appliance cool down.
The red LED blinks at regular intervals
Cause:
- The jug is not correctly inserted in the housing.
Solution:
- Check the position of the jug at the base.
The appliance stops while running, and the white LED blinks
Cause:
- The blades may have jammed.
Solution:
- Unplug and release the blades using a putty knife.
There are leaks from the blade assembly
Causes:
- Incorrect cleaning of the blender jug and blade assembly Do not wash the jug with the blade assembly in the dishwasher.
- The blade assembly was not correctly assembled after cleaning.
Solutions:
- Replace the blade assembly.
- When assembling the blade assembly after cleaning, turn clockwise until fully inserted.
Blade overall assembly
- Turn the blade clockwise.

- The Smeg Blade is not inserting properly.
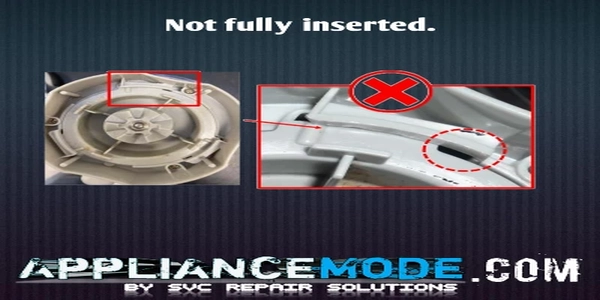
- The Smeg blade is inserted properly.
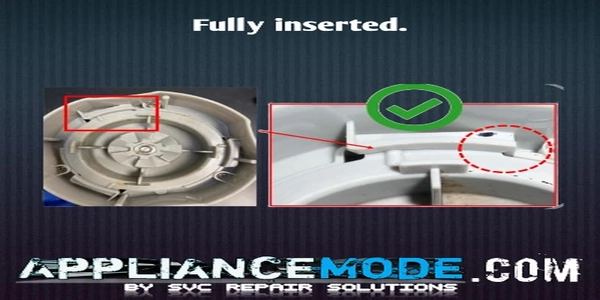
- Three screws secure the jug to its support.

Worn blade assembly
Cause:
- Incorrect cleaning of the blender jug and blade assembly
- Do not wash the jug with the blade assembly in the dishwasher.
Solution:
- Replace the blade assembly.
Removal of the blade assembly
- Grasp the handle.
- Lift the blender jug.

- Remove the lid 2 from the jug and the dosing cap 3 from the lid.

- Turn the jug upside down.
- Place it on a flat surface.
- Insert the lower part of the dosing cap 3 inside the blade assembly.

- Turn the dosing cap counter-clockwise.
- Unscrew the blade assembly 4 from the jug body, then manually remove the blade assembly 4 from the jug body.

- Wash the jug, dose cap, and blade assembly in hot, soapy water or in the dishwasher (except for the blade assembly).

- Note: The pulse button can be used for up to two seconds at a time. Do not operate at speeds 1-4 for more than one minute at a time.


I am a master appliance repair technician with over 35 years of experience in the field. I am passionate about helping people troubleshoot their appliances and fix common problems. My website, appliancemode.com, provides a wealth of information on troubleshooting common appliance issues and deciphering error codes. This website aims to empower people to tackle appliance repairs themselves and save money on service calls.
Mine has a slow leak from the shaft that holds the blades – Not the blade assembly main seal.