Whirlpool Range Error Codes
In this guide, we’ll explain the most common Whirlpool range error codes, what they mean, and how to troubleshoot them. Whirlpool ranges use diagnostic codes to detect problems with temperature sensors, heating elements, door locks, control boards, touch panels, and electrical safety systems.
When an error code appears, it usually means the range has detected a fault and may stop heating or disable certain functions for safety.
Common Whirlpool Range Error Codes
F1E0: EEPROM Error
This code typically points to an issue with the appliance’s internal memory (EEPROM).
- Related Error Codes:
- F1E5: Sensor out of range error.
- F1E7: Main board thermistor open or shorted error.
- F1E9: WIDE queue full error.
- Solutions:
- Cool-Down Period: Allow the stove to cool down completely before attempting any further troubleshooting. Sometimes, a simple cool-down can resolve temporary glitches.
- Control Board Replacement: If the error persists after cooling, consider replacing the main control board. This component houses the EEPROM and is often the source of this error.
F2E0: Keypad Disconnected
This code indicates a problem with the connection or functionality of the control panel keypad.
- Related Error Codes:
- F2E1: Shorted buttons on the user interface (stuck button).
- F2E2: Cancel button malfunction.
- Solutions:
- Check Keypad Connection: Carefully inspect the ribbon cable connection between the keypad (user interface) and the main control board. Ensure it is firmly seated and not loose or unplugged. Reconnect if necessary.
- Allow Recognition Time: After reconnecting, allow at least 2 minutes for the main control to recognize the keypad.
- Replace User Interface Board: If the error persists, the user interface board itself may be faulty and require replacement.
- Replace Main Board (Last Resort): If replacing the user interface board doesn’t resolve the issue, the problem might lie with the main control board.
- Final User Interface Panel Check: As a last step, ensure the user interface panel itself is not damaged or warped, which could prevent proper button presses.
- Post-Repair Verification: After plugging the range back in, enter diagnostic mode (explained later in this guide) to verify normal operation and the absence of error codes.
F3E0: Oven Temperature Sensor Error (Open or Shorted)
This code indicates a problem with the oven’s temperature sensor, which is crucial for accurate temperature regulation.
- Solutions:
- Inspect Sensor Connections: Begin by thoroughly inspecting all connections on the harness leading to the oven temperature sensor.
- Trace and Inspect Wiring: Follow the wires and connectors from the sensor to the control board. Look for any signs of damage, such as nicks, cuts, or burnt sections. If damage is found, replace the entire wiring harness.
- Test Oven Temperature Sensor Resistance: If the wiring appears intact, test the oven temperature sensor’s resistance using a multimeter.
- Oven Temperature Sensor Specifications:
- At 25°C (77°F), the resistance should be approximately 1150 Ω.
- If the measurement is incorrect or shows a short circuit, replace the sensor.
- Oven Temperature Sensor Specifications:
- Diagnostic Mode & Bake Test: Enter diagnostic mode (detailed below) and clear the fault code. Then, activate the “BAKE TEST.”
- If the error code disappears, your repair was successful.
- If the error persists, disconnect power and recheck all wire connections. If the issue still persists, replacing the main control board may be necessary.
F3E2: Warming Drawer Sensor Error (Open or Shorted)
Similar to F3E0, this code points to an issue with the warming drawer’s temperature sensor.
- Solutions:
- Examine Sensor Connections: Start by examining all connections between the warming drawer sensor and its harness.
- Check Wiring & Connectors: Closely inspect the wiring and connectors linking the control board and the warming drawer sensor. Replace the harness if any damage is observed.
- Test Warming Drawer Sensor Resistance: If the wiring and connectors are in good condition, measure the warming drawer sensor’s resistance using a multimeter.
- Warming Drawer Sensor Specifications:
- At 25°C (77°F), the resistance should be approximately 1150 Ω.
- If the reading is incorrect or a short is detected, replace the sensor.
- Warming Drawer Sensor Specifications:
- Main Board Replacement (If Necessary): If these steps do not resolve the issue, you may need to consider replacing the main control board.
F5E0: Door Switch Error
This error indicates a problem with the oven door’s locking or latching mechanism.
- Related Error Codes:
- F5E1: Door latch not operating error.
- Solutions:
- Thorough Latch System Inspection: Inspect the entire latch system, starting from the latch motor and/or contact switch to the locking mechanism itself.
- Examine Mechanical Integrity: Examine the integrity of the mechanism, from the cam to the latch pawl and the door slot. Ensure the pawl is properly aligned with the door slot and address any mechanical obstructions or misalignments.
- Replace Latch Motor (If Door Not Locked): If the latch switch doesn’t register that the door is locked, install a new latch motor.
- Test Latch Motor Relay/Motor: If the latch motor relay or the motor itself isn’t functioning, first check the voltage at the main board. Then, measure the resistance and continuity of the latch motor using a multimeter.
- Door Latch Motor Specifications:
- Resistance should be approximately 300-3000 Ω.
- If continuity exists, examine the electrical connections and harness for damage.
- If continuity is absent, replace the motor assembly.
- Door Latch Motor Specifications:
- Verify Voltage & Replace Control: Ensure the Whirlpool range input voltage is correct (ideally 120 V). If it is, replace the control board and confirm its normal operation.
F6E1: Oven Overheating Error (F6E Family)
This code suggests the oven is sensing an excessively high temperature.
- Solutions:
- Calibrate Stove Temperature: Attempt to calibrate the stove temperature according to your owner’s manual instructions.
- Inspect Limiter Switch Harness: Examine the wire harness connected to the limiter switches. Replace it if there’s an incorrect reading or a short circuit detected.
- Verify High Limit & Thermal Fuse Resistance: Use a multimeter to verify the resistance of the high limit switch and the thermal fuse.
- High Limit Specifications: The circuit should remain closed up to a maximum temperature of 560°C (1050°F), after which it will open. Resistance should be approximately 0.2-1.2 Ω.
- Thermal Fuse Specifications: At 110°C (230°F), resistance should be approximately 0.2-1.2 Ω.
- Confirm Heating Element & Fan Motor Resistance: Use a multimeter to confirm the resistance of the bake, broil, and convection elements, as well as the convection fan motor.
- Bake Element: Approximately 38 Ω
- Broil Element: Approximately 38 Ω
- Convection Element: Approximately 38 Ω
- Convection Fan Motor: Approximately 18 Ω
- Replace Control Board (If Relay Closed): If the heating element relay remains closed (indicating it’s stuck on), change the control board.
Whirlpool Range Diagnostic Mode
The diagnostic mode on your Whirlpool range is an invaluable service tool that allows you to identify and test key components. It provides a comprehensive analysis, helping pinpoint issues and facilitating quick, efficient repairs. Technicians use this mode to troubleshoot heating elements, sensors, and control boards, ensuring optimal appliance performance.
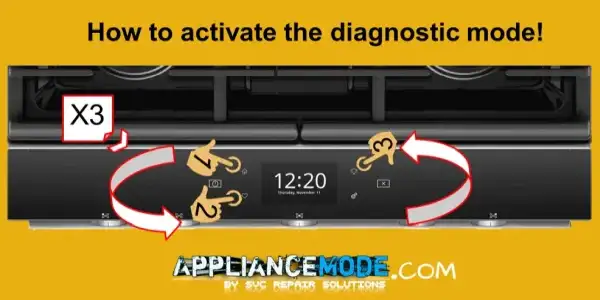
1. Step-by-Step Guide to Activating Diagnostic Mode:
To initiate diagnostic mode, ensure your range is cool and powered on. Then, press the following sequence of buttons without any 1-second delay: 1- HOME | 2- FAVORITES | 3- LIGHT
Repeat this precise sequence two more times, all within an 8-second window. This will activate diagnostic mode on your Whirlpool range.
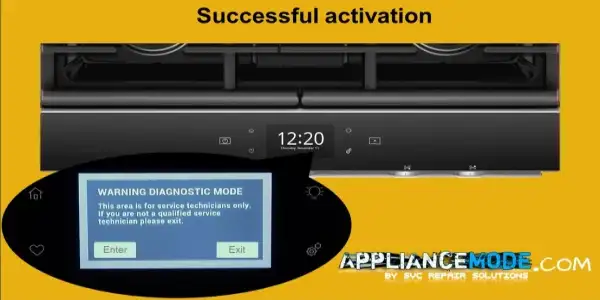
2. How to Confirm Successful Activation:
You’ll know diagnostic mode is active when you see this message displayed on the LCD screen:
“This area is for service technicians only. If you are not a qualified service technician, please exit.”
3. Navigating the Service Diagnostic Mode:
Once activated, follow the on-screen instructions to navigate.
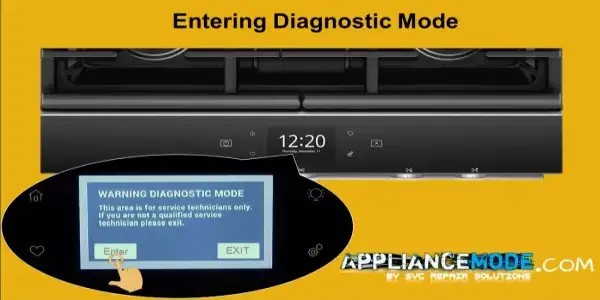
3.1. Entering Test Mode:
To access the various test cycles within diagnostic mode, simply press the ‘ENTER’ button.
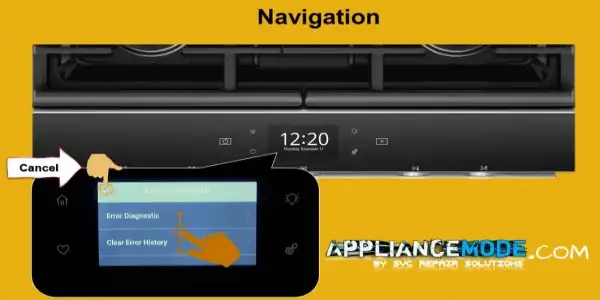
3.2. Navigating Through Tests:
Use the touch or swipe feature of your screen to explore the different tests available. Once you’ve found the desired test, press on it to proceed.
4. Diagnostic Mode Functions Explained:
| Test Mode | Function Behavior |
|---|---|
| Error Diagnostic | Provides a comprehensive log of all previous errors or faults encountered by the appliance. |
| Clear History | Resets or clears the log of any previous errors or faults detected by the main board. |
| Component Activation | Allows you to activate and test individual relays for components like DBL, Bake, Broil, Convection Ring, Convection Fan, Cooling Fan, and Light. |
| System Info | (Not typically utilized in the field for general troubleshooting) |
| Factory Setting | (Not typically utilized in the field for general troubleshooting) |
5. Exiting Diagnostic Mode:
To exit diagnostic mode and return your range to normal customer operation, simply press the ‘CANCEL’ button repeatedly until the main display reappears.
Final Thought
Whirlpool range error codes help identify faults in temperature control, heating systems, door locking mechanisms, sensors, and electronic controls. While many issues can be fixed with a simple reset or sensor replacement, persistent or recurring errors often indicate a failing control board or electrical component that requires professional diagnosis.

I am a master appliance repair technician with over 35 years of experience in the field. I am passionate about helping people troubleshoot their appliances and fix common problems. My website, appliancemode.com, provides a wealth of information on troubleshooting common appliance issues and deciphering error codes. This website aims to empower people to tackle appliance repairs themselves and save money on service calls.