

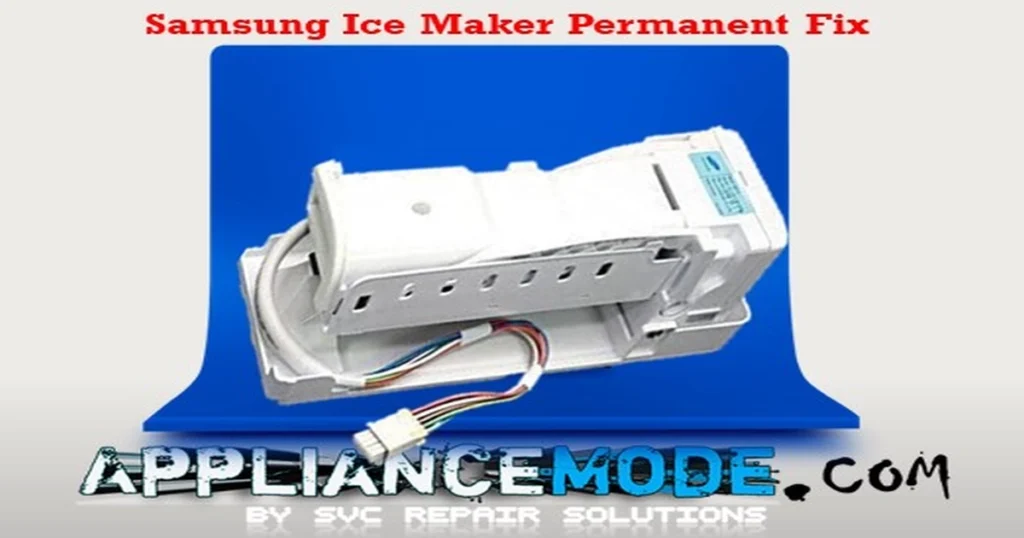
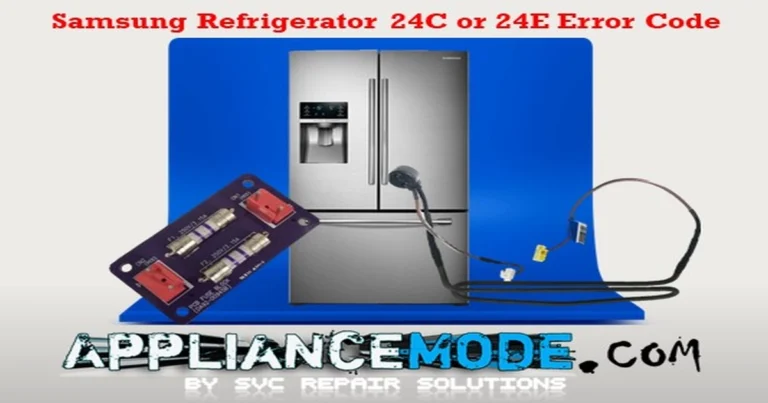
DIY Samsung Ice Maker Permanent Fix: A Step-by-Step Guide
Dealing with a Samsung ice maker that keeps freezing up? Tired of the constant thawing and refreezing routine? You’re not alone in this frustration. Ice buildup is a common problem, but there’s a solution. This guide will simplify the process, helping you understand why it happens and giving you the know-how to fix it.
We’ll walk you through identifying the issue, the necessary steps for disassembly and repair operations, and finally, achieving a Samsung ice maker permanent fix that gets your ice maker working smoothly again.
Samsung Ice Maker Permanent Fix Tips
Remember to always unplug the fridge and exercise caution when attempting any repairs.
Step 1: Check the display to see if the “Ice Off” icon is not activated
- Check the “Ice Off” icon on the display.
- To make ice, ensure that the “Ice Off” icon is deactivated.
- When the ice maker is off, you have to press the display button for more than three seconds, and it will automatically turn on the ice maker.
- The position of the “Ice Maker Off” button is different by model. You will find all the settings for activating and/or deactivating the ice maker in your Samsung refrigerator user manual.
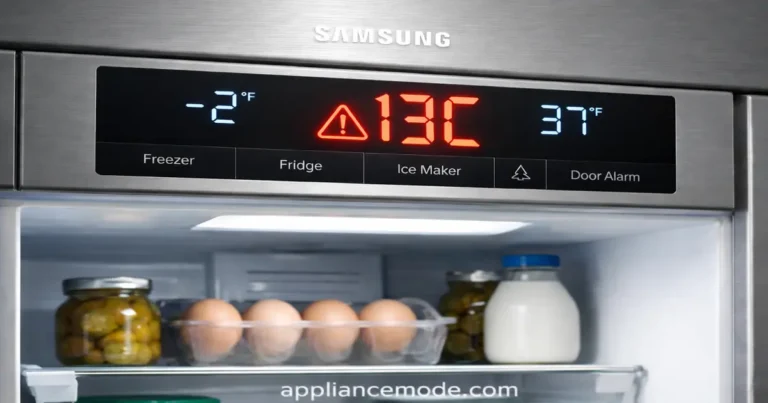
Step 2: Finding Error Codes on Your Samsung Refrigerator Control Panel using Self-Diagnostic mode
To initiate self-diagnostic mode and check for error codes, follow these steps:
- Locate the freezer and fridge buttons on the fridge’s control panel.
- Press and hold both buttons simultaneously for a full 10 to 14 seconds.
- Listen for a “ding-dong” sound, which confirms successful activation of self-diagnostic mode.
- If no sound is heard, repeat steps 1-3 to ensure proper activation.
Error Code Display:
- If an error is detected, the unit will display the corresponding error code on its display panel.
- The code will remain visible for 60 seconds, providing ample time for you to note it down.
Return to normal operation.
- After 60 seconds, the unit will automatically revert to its normal operating condition.
Discovery Ice Maker error messages
| Common error codes | Error description | Remark |
|---|---|---|
| 14C–14E–8C–8E | Ice Maker Sensor Error | Faulty Ice Maker Sensor |
| 15C–15E | Ice Room Sensor Error | Faulty Ice Room Sensor |
| 39C – 39E | Ice Maker Function Error | Faulty Ice Maker |
| 40C–40E | Ice Room Fan Error | Faulty Ice Room Fan |
| 61C – 61E | Ice Duct Heater Error | Faulty Ice Duct Heater |
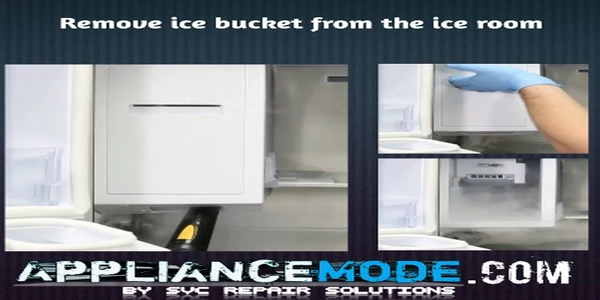
Step 3: Remove the ice bucket from the ice room
To safely remove the ice maker, follow these steps:
- Initiate Defrost Mode:
- Engage the Forced Defrost Mode: Locate and activate this mode on your specific fridge model. This will initiate the ice-melting process and warm up the cooling loop, making ice removal easier.
- Consult the manual for specific instructions. Refer to your fridge’s service manual for precise instructions on how to activate this mode, as methods may vary between models.
- Inspect and loosen the ice maker assembly.
- Assess Ice Maker Condition: While the fridge is in defrost mode, carefully examine the ice maker assembly for any areas of stuck ice or blockages.
- Utilize a Steamer for a Stuck Ice Bucket: If the ice bucket is frozen in place, use a steamer to gently melt the ice until the bucket can be freely removed.
- Maintain Safe Distance: Avoid direct contact between the steamer and any electrical components or wiring within the ice maker assembly.
- Clear Ice from Duct and Loop:
- Focus Steam on Specific Areas: Direct the steamer’s steam towards the discharge duct and ice maker loop to clear any remaining ice buildup.
- Prioritize Safety: Exercise caution and avoid excessive heat application that could potentially damage the appliance.
- Utilize Steamer for Ice Room Clearance:
- Employ Steamer Exclusively: Refrain from using heat guns or hairdryers, as the intense heat can melt the fridge’s plastic liner, leading to irreversible damage.
- Steamer’s Ideal Application: The steamer provides a safe and effective method for clearing ice from the ice room without harming the unit.
Additional Safety Considerations:
- Protect Surrounding Areas: Place towels or absorbent material around the work area to manage any water runoff during the defrosting process.
- Exercise Caution: Avoid forceful pulling or prying on the ice maker components to prevent damage.
Do’s
Don’ts

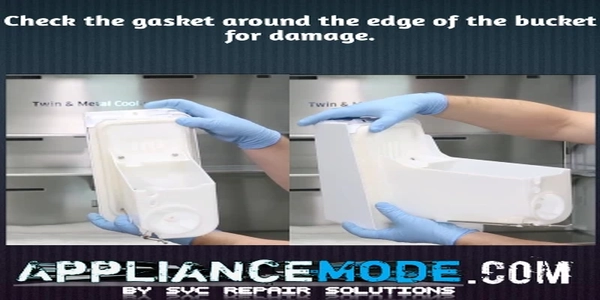
Second, check the gasket around the edge of the bucket for damage; for instance, if it’s cracked, rolled, or too rigid, preventing a proper seal, replace the ice bucket if it’s damaged.
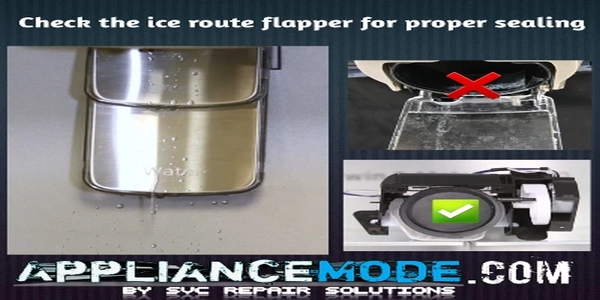
Step 4: Check the ice route flapper for proper sealing
- Start by adding a small quantity of water, approximately one to two ounces, directly into the ice route, and observe if there are any signs of leakage from the dispenser.
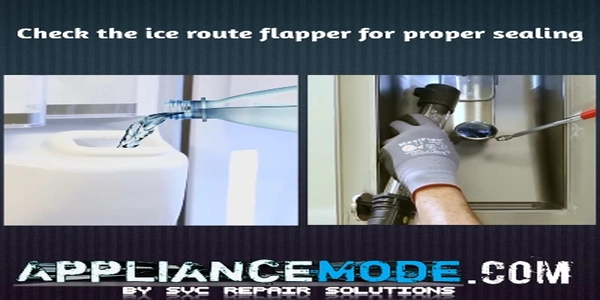
- If there is a leak, disassemble the ice chute flapper and ensure that the rubber seal is intact and not torn or brittle.
- Replace it if necessary.
Step 5: Deactivating forced defrost mode
Before attempting to clear the ice room, it is important to first exit from defrost mode and ensure that the refrigerator is in cooling-off mode (demo mode, showroom mode), or simply unplug it. This will prevent the cooling loop in the ice room from frosting over while you are trying to clear the ice.
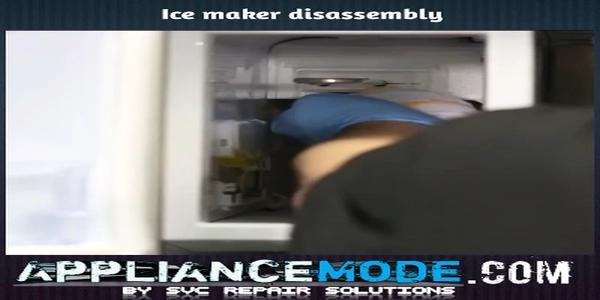
Important: Remove all frost around the ice bucket, ice maker, and auger motor using a steamer.
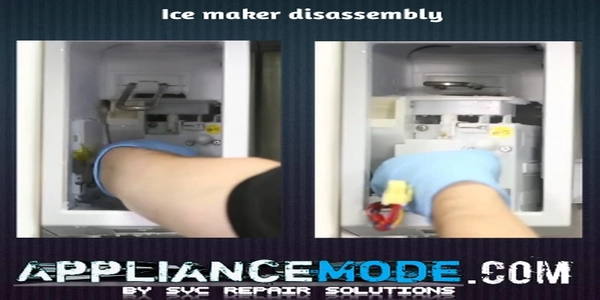
Step 6: Ice maker teardown (how to remove a Samsung ice maker)
- Unscrew the left screw.
- Open the wire connector cover.
- Remove the ice maker screw.
- Release the ice maker wire harness connector.
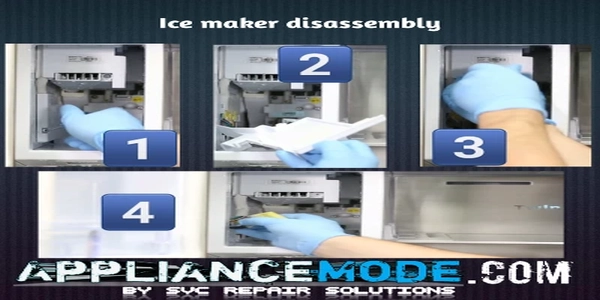
- Use a flat-head screwdriver to pry away the ice maker discharge duct.
- Gently pull down the cooling loop.
- Pull the icemaker out of the ice room carefully.
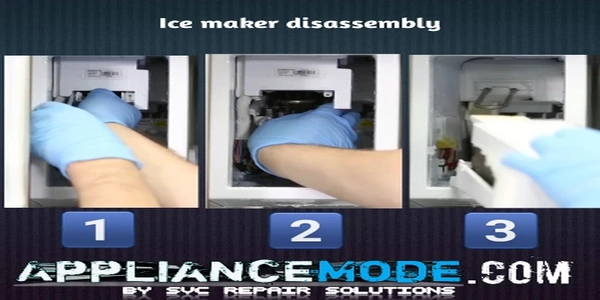
- Continue using the steamer to mount the ice room.
- Then lift up the cooling loop.
- Disconnect the auger wire harness connector and then remove the auger motor.
- Now steam directly into the drain until it is clear.
- Use a towel to remove water and moisture.
- Dry completely, or ice-forming problems can reoccur.
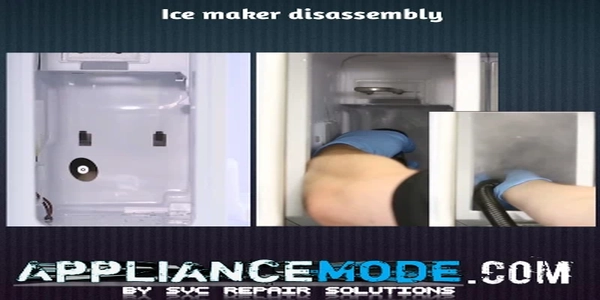
- Check if there are any other particles or frost inside the drain pipe of the Auger motor.
- If any ice or frost is left, it can cause the issue to resurface.
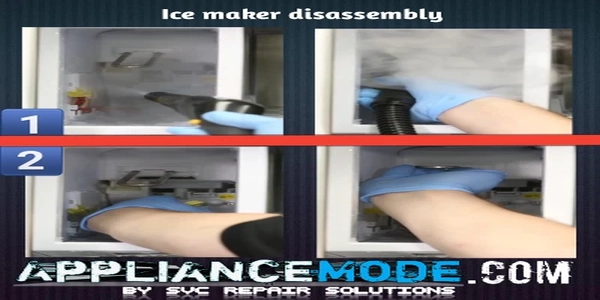
Check the full defrosting using your finger
- Inspect the L-Duct flow path (between the front and bottom) for any signs of frost buildup.
- Check the drain pipe in the auger motor for any frost or ice blockages.
- Verify that the drain hole is clear of any debris or frost.
Remove all water traces in the ice room
- Clean the L-Duct flow path (between the front and bottom) of any water traces.
- Clean the drain pipe in the Auger motor of any water traces.
- Clean the interior of the ice room of any water traces.
- Ensure that the L-Duct flow path, drain pipe, and drain hole are free from any blockages, frost, or particles.
Do not replace the auger assembly unless you find a defect, such as a fan or motor or physical damage.
Step 7: Check the position of the waterline
- Use an inspection mirror.
- Check the position of the waterline as it enters the ice room.
- Press in to hold the gray retainer ring and back out the gray fill hose about 10 mm. Inspect the position of the waterline.
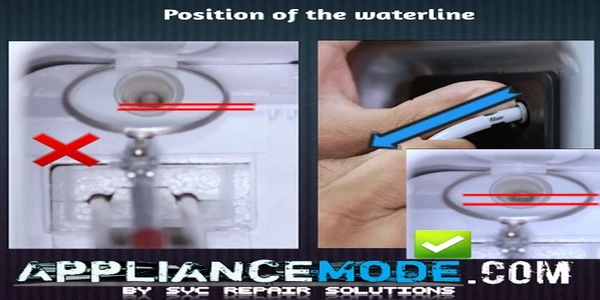
- Adjust the fill hose until it’s inserted in the proper position just inside the ice room.
- It’s also important to re-secure the hoses to a flush position on the rear of the cabinet so they do not move when reinstalling the fridge back against the wall.

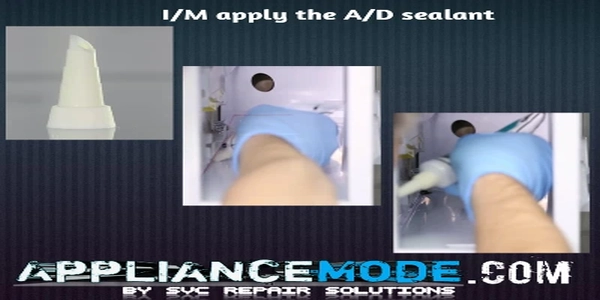
Step 8: Seal the ice room with the adhesive sealant epoxy provided
Step 8.1: Gather your tools.
- Red flashlight: A red light source minimizes the glare reflecting off the ice room, making it easier to spot air leaks. You can use a red filter over a white flashlight if you don’t have a dedicated red one.
- Sealant: Choose a sealant appropriate for the materials of your ice room and the temperature it operates at. Some options include silicone caulk or foam sealant.
- Optional: Rag or cloth for wiping away any condensation around potential leak sites.
Step 8.2: Prepare the ice room.
- Dim the lights in the surrounding area to make the red light from your flashlight more visible.
Step 8.3: Inspect the edges.
- Start at the top of the ice room walls and slowly move the red light beam along the edges, paying close attention to:
- Corners and joints: These areas are particularly susceptible to leaks due to expansion and contraction.
- Sealing around hatches: Check for gaps or cracks where the hatch meets the wall.
- Penetrations for pipes, cables, or other fixtures: Look for any gaps around these entry points.
Step 8.4: Identify and seal leaks.
- If you spot any gaps or cracks, estimate their size and accessibility. Small leaks might be easily sealed with a caulking gun, while larger ones might require a different approach, like foam sealant or patching the material.
- Clean the area around the leak with a dry rag or cloth to remove any dirt or condensation that might hinder the sealant’s adhesion.
- Apply the sealant. Ensure you fill the gap completely and create a smooth, airtight seal.

- Cut the second ring from the applicator tip at a 45-degree angle.
- Start applying the sealant at the drain hole in the right rear corner of the ice room.
- Continue applying the sealant evenly across the back seam and along the left bottom seam until you reach the corner.
- For extra protection, you can also apply a thin line of sealant to the left front seam, as shown in the example (see image).
- Wipe away any excess sealant with a clean cloth.
Recommendation
Generally, most adhesive sealants take about 12 to 24 hours to cure completely, depending on the amount and type used. To ensure the sealant has fully dried, it is recommended to turn off the refrigerator and keep the doors open until the adhesive sealant is completely dry.
Step 9: Reinstall the auger motor assembly
Installing the ice room service kit, retainer ring, and white clip assembly
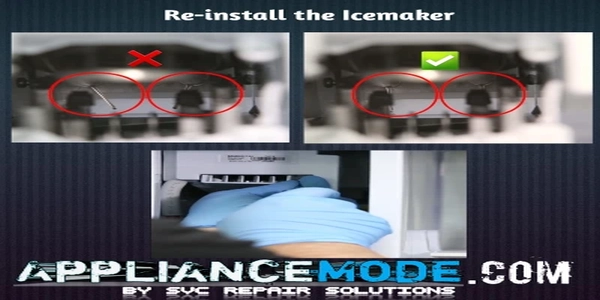
- Remove the old retainer ring from the cooling loop, install the new one in its place, and install the Y-clips on the cooling loop so that they are facing directly downward.
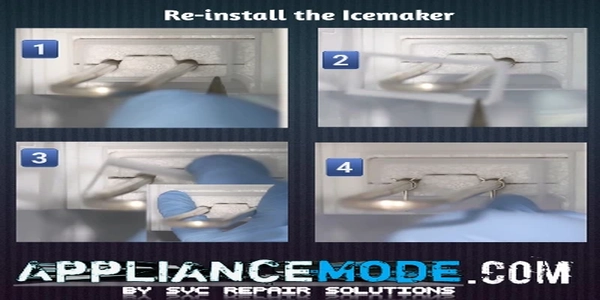
- Reinstall the auger assembly back into position in the ice room.
- Reconnect the wire harness connector.
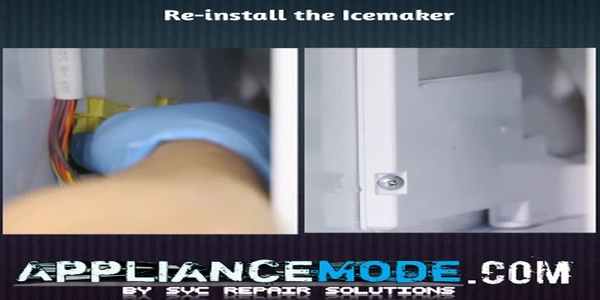
- Install the icemaker assembly.
- Pushed up the cooling loop.
- Double-check the orientation of the clips to ensure they are still pointing straight down before proceeding with further assembly.
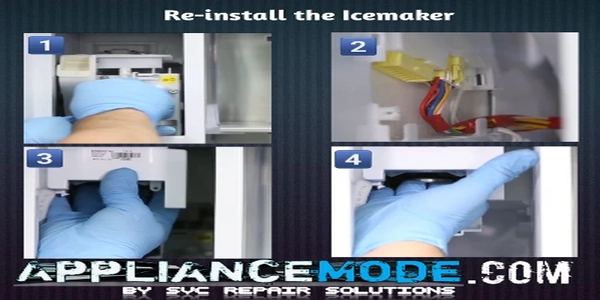
- Install the icemaker screw.
- Add the icemaker screw.
- Insert the Harnes connector.
- Reinstall the wire cover and screw.
Final step: Add the ice bucket
Add the ice bucket, and finally power on the fridge to perform the final inspection.

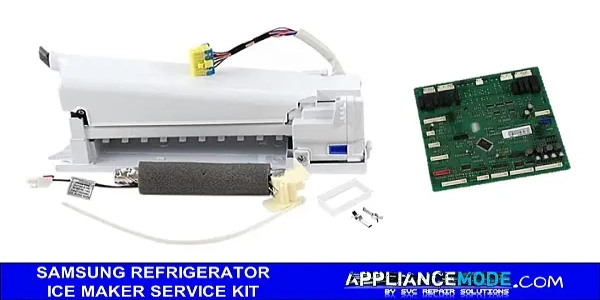
Samsung Ice Maker Service Kit
In this section, we will outline the Samsung ice maker service kit part numbers applicable to most refrigerators experiencing ice buildup in the ice room. Please note that you are not required to replace any parts unless they are found to be faulty or defective.
How to Identify the Production Date of Samsung Refrigerators Using Serial Numbers
In this example, we will show you how to identify the manufacturing date of Samsung refrigerators by interpreting their serial numbers. To determine the production date, we need to examine the serial number and, in particular, the eighth and ninth digits. The eighth digit indicates the year of manufacture, while the ninth digit represents the month of manufacture.
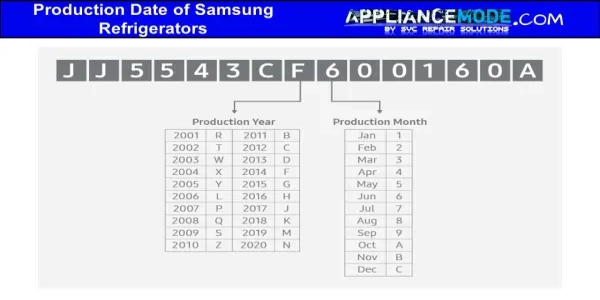
By referring to the image above, we can see that the date of production for this particular Samsung appliance is June 2014.
Samsung ice maker service kit list
| Samsung Refrigerator Model # | Production Range | Samsung Ice Maker Service Kit, Part # |
|---|---|---|
| RF22KREDB | 8/2016 to 12/2018 | DA82-02671A |
| RF22N9781 | Up to 12/2018 | DA82-02655A |
| RF23HCEDB | 5/2016 to 12/2018 | DA82-02698A |
| RF23HTEDB | 5/2016 to 12/2018 | DA82-02699A |
| RF23J9011 | 1/2018 to 12/2018 | DA82-02642A |
| RF24FSEDB | 8/2016 to 12/2018 | DA82-02668A |
| RF22K9381 | Up to 12/2018 | DA82-02645A |
| RF22K9581 RF22M9581 | Up to 12/2018 | DA82-02706A |
| RF22NPEDB | Up to 12/2018 | DA82-02663A |
| RF23M8070 RF23M8090 RF23M8960 | Up to 12/2018 | DA82-02638A |
| RF23M8570 RF23M8590 | Up to 12/2018 | DA82-02640A |
| RF25HMEDB | 7/2016 to 12/2018 | DA82-02695A |
| RF26J7500 | 7/2016 to 12/2018 | DA82-02701A |
| RF263BEAE | 7/2015 to 12/2018 | DA82-02697A |
| RF263TEAE | 6/2015 to 12/2018 | DA82-02713A |
| RF265BEAE | Up to 12/2018 | DA82-02696A |
| RF28JBEDB | 2/2016 to 12/2018 | DA82-02675A |
| RF28HDEDB | 3/2016 to 12/2018 | DA82-02702A |
| RF28HDEDP | 3/2016 to 12/2018 | DA82-02703A |
| RF28HFEDB | 3/2016 to 12/2018 | DA82-02704A |
| RF28HFEDT | 3/2016 to 12/2018 | DA82-02705A |
Final Conclusion
Fixing a Samsung ice maker is often straightforward when approached step-by-step. In many cases, the issue is not a full failure but a combination of water flow restriction, freezing in the fill tube, or sensor miscommunication.

I am a master appliance repair technician with over 35 years of experience in the field. I am passionate about helping people troubleshoot their appliances and fix common problems. My website, appliancemode.com, provides a wealth of information on troubleshooting common appliance issues and deciphering error codes. This website aims to empower people to tackle appliance repairs themselves and save money on service calls.


One thing you don’t mention has fixed my RGS5UUMH ice maker PERMANENTLY!
***Don’t let the door slam shut, close it gently*** – doing that, the water doesn’t spill out of the molds and over the ice and ice maker, where it freezes the system solid and it can’t move. My problem has gone – completely…………..