
DIY Guide: How to Convert Your Samsung Gas Range to Liquid Propane (LP)
Did you just purchase a brand new Samsung gas range, only to realize it comes set up for Natural Gas (NG) but your home runs on Liquid Propane (LP)? Don’t panic. You usually don’t need to return the stove or hire an expensive technician.
With the LP conversion kit (usually included with the range) and a few basic tools, you can safely make the switch yourself. Here is a step-by-step walkthrough of the process.
⚠️ Safety First!
Before you touch a single screw:
- Unplug the range from the electrical outlet.
- Shut off the gas supply valve behind the unit.
- Work carefully. Gas components are brass and can strip easily.
What You’ll Need
Gather these tools before you start. The star of the show is the 7mm nut driver—you will use this for almost every nozzle.
- 7mm Nut Driver or Socket (Crucial)
- Phillips & Flathead Screwdrivers
- Needle-nose pliers
- Adjustable wrench
- Leak detector solution (or soapy water)
- The Conversion Kit & Template (Came with your stove)
Phase 1: Convert the Pressure Regulator
Location: Back of the range
The regulator controls the flow pressure. It needs to know you are using propane, which burns at a different pressure than natural gas.
- Locate the regulator at the bottom rear of the range.
- Unscrew the plastic hex cap.
- Look inside the cap: there is a small pin/stop. Remove it, flip it over, and snap it back into the cap so the side marked “LP” is facing out.
- Screw the cap back onto the regulator.
- Double Check: Ensure the shut-off lever on the regulator is in the OPEN position.
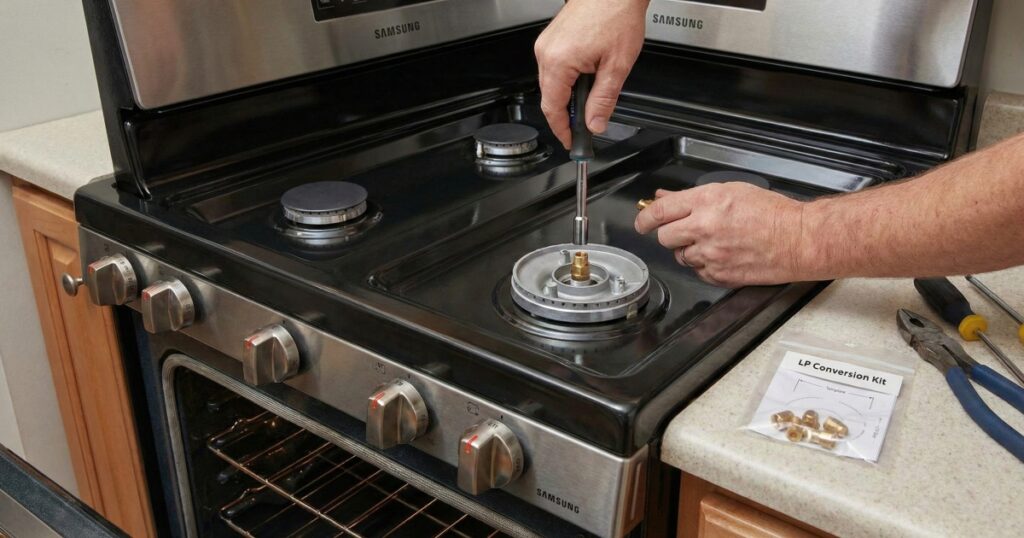
Phase 2: Convert the Cooktop Burners
Location: Top of the stove
- Remove all the burner grates, black caps, and aluminum burner heads.
- Look down into the burner base—you’ll see a brass nozzle (orifice).
- Use your 7 mm nut driver to remove the old natural gas nozzles.
- Consult your chart: Your kit comes with a template telling you which color/size nozzle goes to which burner (Simmer, Rapid, etc.). This is critical!
- Screw in the new LP nozzles.
- Replace the burner heads and caps.
Phase 3: Convert the Oven (Bake & Broil)
Location: Inside the oven
Pro Tip: Remove the oven door first (flip the hinge latches and lift) to save your back and prevent scratching the door.
The Bake Burner (Bottom)
- Remove the oven racks and the screws on the floor of the oven.
- Remove the flame spreader (the metal plate over the burner).
- Unscrew the burner tube and slide it to the left to reveal the nozzle.
- CAUTION: Be incredibly careful with the Hot Surface Igniter (HSI). It is white, square, and extremely fragile. If you crack it, the oven won’t light.
- Use the 7mm driver to swap the nozzle.
The Broil Burner (Top)
- Remove the screws holding the broil element bracket and the flame spreader at the top of the oven.
- Support the burner with one hand while removing the final screws—do not let it hang by the wires!
- Swap the nozzle with the 7mm driver.
- Reassemble all brackets, covers, and the oven door.
Phase 4: Testing & Flame Adjustment
Now that the parts are swapped, you need to tune the airflow. Propane needs a different air-to-gas mixture than natural gas.
- Turn the gas and power back on.
- Light a burner and observe the flame.
- Adjusting the Air Shutter:
- If the flame is YELLOW: It needs more air. Rotate the air shutter Clockwise (Open).
- If the flame is LIFTING/NOISY: It has too much air. Rotate the air shutter Counter-Clockwise (Close).
- You want a steady, blue flame.
Final Step: The Leak Check
Mix a little dish soap with water and dab it on the connections you touched (specifically the regulator). If you see bubbles growing, you have a leak. Tighten the connection and test again.
Congratulations! You are now cooking with Propane.
Disclaimer: This guide is for informational purposes. Always refer to your specific Samsung model’s installation manual. If you are uncomfortable working with gas, please contact a professional installer.

I am a master Appliance Repair technician with over 35 years of experience in the field. I am passionate about helping people troubleshoot their appliances and fix common problems. My website, appliancemode.com, provides a wealth of information on troubleshooting common appliance issues and deciphering error codes. This website aims to empower people to tackle appliance repairs themselves and save money on service calls.