Microwave Capacitor Testing Guide: Discharge, Continuity, and Capacitance
Is your microwave not heating up? It might be the capacitor! The capacitor, alongside the diode, helps power the magnetron that heats your food. If it fails, your microwave won’t heat properly. But before ordering a replacement, consider diagnosing the problem yourself!

This guide, “Microwave Capacitor Testing Guide,” will walk you through two simple tests to determine if your microwave’s capacitor is the culprit behind the lack of heat. However, safety is paramount. Before handling any electrical components, ensure the microwave is unplugged and the capacitor is discharged.
Diagnosing a Microwave That Won’t Heat: Microwave Capacitor Testing Guide
The microwave high-voltage capacitor plays a crucial role in generating the high voltage needed to heat food in a microwave oven. Here’s how it works:
- Power source: The microwave receives electricity from the wall outlet, which is typically AC (alternating current) at household voltage (around 120V in the US and 230V in Europe).
- Transformer: The transformer steps up the voltage from the outlet to a higher level, typically around 2,000 volts AC.
- High-voltage capacitor: This capacitor stores electrical energy. It’s designed with a high capacitance (usually around 1.0 microfarad) and can withstand high voltages (around 2,100 volts AC in standard models).
- Diode: The diode allows the current to flow in only one direction. It works with the capacitor to convert the AC voltage from the transformer into a pulsating DC (direct current) voltage.
- Magnetron: This is the heart of the microwave. It uses the high-voltage DC provided by the capacitor and diode combination to generate electromagnetic waves, which are responsible for heating the food.
The high-voltage capacitor plays a crucial role in a microwave oven by:
1. Storing and releasing energy:
- The capacitor acts like a temporary storage unit for electrical energy.
- It collects the alternating current (AC) from the transformer in the microwave.
- This AC current alternates its direction rapidly, but the capacitor stores the peak voltage during each cycle.
2. Doubling the voltage:
- While the capacitor stores the peak voltage, a diode connected in series converts the AC to direct current (DC).
- This DC voltage is essentially the stored peak voltage from the AC cycle, effectively doubling the voltage from the transformer.
3. Supplying power to the magnetron:
- This high-voltage DC is then sent to the magnetron, which is the heart of the microwave.
- The magnetron uses this high voltage to create microwaves, the electromagnetic waves that heat your food.
Troubleshooting Microwave Heat Issues: Testing the Capacitor
While it’s always recommended to consult a qualified appliance repairman for major repairs, you can perform two basic tests to check if the capacitor needs replacement.
Test 1: Checking Charging and Discharging (Leakage Test)
Before you begin, a crucial safety tip! Capacitors can store dangerous amounts of charge even after the microwave is unplugged. To avoid potential injury, discharge the capacitor by carefully touching a screwdriver with an insulated handle across the two terminals. Be very careful not to touch the metal part of the tool while doing this!

- Set your multimeter to a high-resistance setting (1000 ohms or higher).
- Calibrate the meter by touching the probes together and adjusting the needle to zero.
- Touch one probe to each terminal of the capacitor. The needle should briefly deflect towards zero and then return back to the high-resistance range.
If the needle doesn’t move at all or stays near zero, the capacitor is likely faulty and needs replacement. (For instructions, see the video guide.)
While Test 1 focused on observing the needle movement on an analog multimeter, we can achieve a similar check for a capacitor using a digital multimeter in continuity mode. This method also emphasizes safety precautions.
Remember: Even after the microwave is unplugged, a capacitor can store dangerous amounts of charge. Always discharge the capacitor before handling it.
Here’s how to perform the test:
- Discharge the capacitor by carefully touching a screwdriver with an insulated handle across the two terminals. Be very cautious not to touch the metal part of the tool while doing this!
- Set your digital multimeter to continuity mode.
- Touch the test probes to each terminal of the capacitor.
- Observe the meter’s response:
- If the meter beeps or displays a reading close to zero ohms (e.g., 0.1–0.2 ohms), the capacitor is likely shorted and needs to be replaced.
- If the meter doesn’t beep or displays “OL” (open circuit), the capacitor is likely functional.
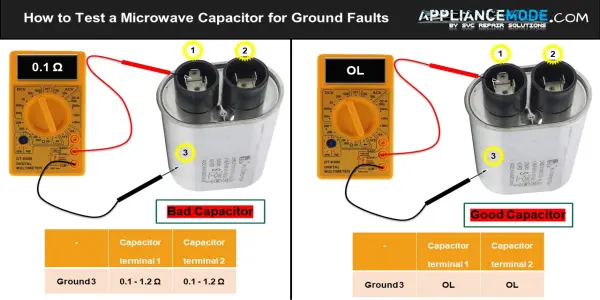
Ground Test: Checking for Shorting
This test helps determine if the capacitor’s internal components have shorted to the metal casing, which can render it non-functional.
Remember: Always discharge the capacitor before handling it, as explained in previous tests.
Here’s how to perform the ground test:
- Set your digital multimeter to continuity mode.
- Place one probe on each of the capacitor’s terminals.
- With the other probe, touch the metal casing of the capacitor.
- Observe the meter’s response:
- If the meter beeps or displays a reading close to zero ohms (e.g., 0.1–0.2 ohms), it indicates a short circuit between the terminal and the casing. This means the capacitor is faulty and needs to be replaced.
- If the meter doesn’t beep and instead displays “OL” (open circuit), it signifies no short circuit, and the capacitor might be functional in this aspect.
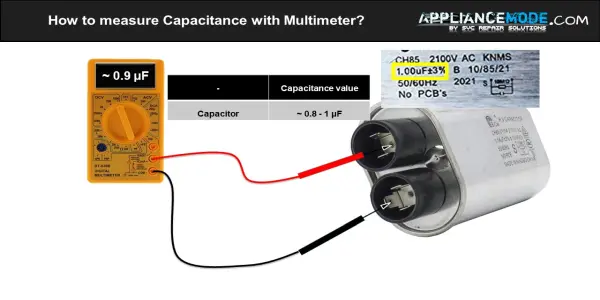
Test 2: Measuring Capacitance
Before you start, ensure the capacitor is discharged again.
- Look for the microfarad (µF) rating printed on the capacitor. This is its capacitance value (usually around 1.0 microfarad.)
- Set your multimeter to the capacitance testing function or use a dedicated capacitor tester.
- Select the appropriate setting based on the capacitor’s microfarad rating.
- Touch the probes to the capacitor terminals and observe the reading.
- Compare the reading to the rated capacitance value on the capacitor. If it’s significantly lower, the capacitor needs to be replaced.
Take a look at the tutorial video.
Conclusion
Understanding the functionality and conducting regular testing of the microwave high-voltage capacitor is essential for maintaining the efficiency and safety of your microwave oven.

I am a master appliance repair technician with over 35 years of experience in the field. I am passionate about helping people troubleshoot their appliances and fix common problems. My website, appliancemode.com, provides a wealth of information on troubleshooting common appliance issues and deciphering error codes. This website aims to empower people to tackle appliance repairs themselves and save money on service calls.