Whirlpool Dryer Error Codes Explained!
In this guide, we’ll explain the most common Whirlpool dryer error codes, what they mean, and how to troubleshoot them. Whirlpool dryers use built-in diagnostic systems to detect issues related to airflow, heating, sensors, motor operation, door switches, and electronic control boards.
Whirlpool dryer error codes explained: “Top-Load Matching Dryers”
F1E1: Main control board error
This F1E1 code indicates that there is either no voltage detected at the heater relay or a malfunction in the main control board. Note: The main board has a built-in diagnostic LED, which serves as a troubleshooting tool. If the LED is flashing, it means that the firmware is functioning properly and that the incoming line voltage is correct. However, if the LED is either off or on, it indicates a control malfunction.
Solutions:
- Check the power cable.
- Verify the voltage output of the power source. If the measured voltage is outside of the normal range, contact an electrician to inspect the power supply. If the measured voltage is within the normal range, proceed with further testing.
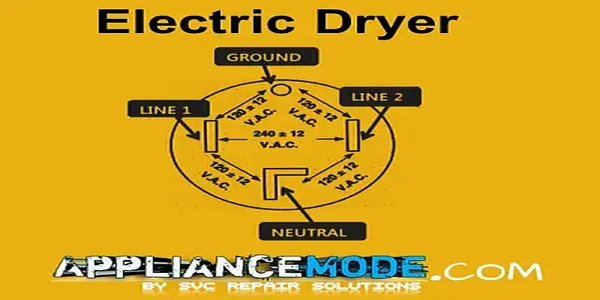
- Measure the voltage at the dryer’s terminal block to ensure a proper electrical connection.
| Terminal block | Voltage value |
|---|---|
| Hot, Line 1 and Line 2 | 240 Vac |
| Hot, Line 1 and Neutral | 120 Vac |
| Hot, Line 1 and Ground | 120 Vac |
| Line 2 and Neutral | 120 Vac |
| Line 2 and Ground | 120 Vac |
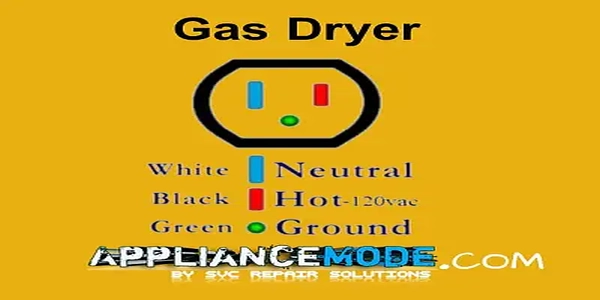
| Terminal block | Voltage value |
|---|---|
| Hot, Line 1 and Neutral | 120 Vac |
| Hot, Line 1 and Ground | 120 Vac |
- Confirm that the wires are securely connected to the heater elements and the relay on the control board.
- Examine the motor circuit components, including the drum belt, door switch, wiring harness, thermal fuse, drive motor, belt switch, motor capacitors, and centrifugal switch, to identify any faults or malfunctions.
F2E1: User interface stuck button error
This F2E1 code indicates that a button on the dryer’s user interface is stuck and has been depressed for more than 20 seconds.
Solutions:
- Inspect the front panel visually to ensure that it is functioning correctly.
- Ensure that the user interface and connector are properly inserted into the front console by conducting a visual inspection.
- If the visual inspection is successful, replace the user interface and conduct a “button test” to ensure that the repair has been completed.
F2E2: User interface disconnected error
This code indicates that there is an internal fault in the dryer’s user interface.
Solutions:
- Verify that all connectors are completely inserted into the main control board by inspecting them visually.
- Inspect all connections visually and reconnect them as necessary.
- If all of the visual inspections are successful, replace the user interface, run the service diagnostic, and activate the HMI test to confirm that the repair has been completed.
F3E1: Outlet “Exhaust” sensor error
This code indicates that the exhaust thermistor is either open or shorted.
Solutions:
- Clean and eliminate any obstructions or lint buildup on the sensor that might prevent the sensor from accurately measuring the temperature.
- Inspect the wire harness connection of the sensor and ensure that it is properly connected to the control board.
- Use an ohmmeter to test the sensor resistance, and compare the readings to the table below. If the reading falls outside the acceptable range, then consider replacing the sensor.
| Electric part name | Temperature | Ohmic VALUE |
|---|---|---|
| Exhaust thermistor | 21°C | 70°F | ~ 11 – 14 KΩ |
F3E2: Moisture sensor error (Same as F3E5: Rear moisture sensor error)
This code indicates that the moisture sensor strip is either open or shorted.
Solutions:
- To test the moisture sensor, follow the Service Diagnostics procedures and select the Diagnostics Cycle. Wait for the sensing phase to begin, and then open the door. Touch both moisture sensor strips with a wet cloth or your hand.
- If the drum light turns off, the moisture sensor has passed the test.
- Verify the inlet sensor’s condition.
- If the drum light does not turn off after multiple attempts to touch both moisture strips, inspect the moisture sensor for any lint buildup that may be impeding its ability to detect moisture.
- Verify the sensor’s continuity with an ohmmeter, and replace it if necessary.
- If the drum light turns off, the moisture sensor has passed the test.
F3E3: Inlet sensor error
This code indicates that the inlet thermistor is either open or shorted.
Solutions:
- Ensure that the temperature sensor is unobstructed, and remove any accumulated lint or debris that might prevent it from detecting the temperature accurately.
- Verify that the sensor’s wire harness connection is securely attached to the control board.
- Use an ohmmeter to test the sensor’s resistance, and replace it if the reading falls outside the normal range.
| Electric part name | Temperature | Ohmic value |
|---|---|---|
| Inlet thermistor “Electric Dryer” | 25°C | 77°F | ~ 49–51 KΩ |
| Inlet thermistor “Gas Dryer” | 25°C | 77°F | ~ 46–54 KΩ |
F6E1: Communication error
This code indicates that there is a communication error between the dryer’s user interface and the main board.
Solutions:
- Ensure that all connections are securely seated on the main control board by performing a visual inspection.
- Thoroughly examine all connections and reconnect any that appear to be loose or disconnected.
- After verifying all visual inspections are satisfactory, install the new user interface, perform the service diagnostic, and activate the HMI test to confirm the repair was successful.
A power outage has been detected; a notification has been sent.
This notification indicates that there has been a power outage and that the dryer has stopped working. To solve this problem, press the Power button to clear the message and restart the cycle.
Check vent: Airflow issue detected notification
This notification indicates that the dryer has detected a blockage in the airflow system, which may affect dryer performance. To resolve this issue, press any button except the Power button to clear the display message. Check and/or clean the lint screen, exhaust duct, and exhaust fan to ensure that the airflow system is functioning properly.
Whirlpool dryer service diagnostic mode:
How can the service diagnostic mode be useful?
The service diagnostic mode allows a factory or service technician to perform comprehensive tests on the main control board. Running these tests can give you an overall assessment of the dryer’s condition before moving on to more specific troubleshooting tests.
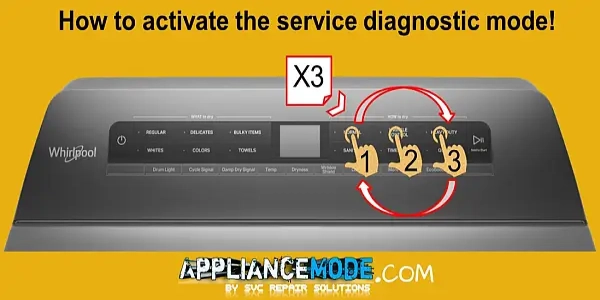
How can I activate the service diagnostic mode?
To activate the service mode, turn off the dryer, ensure it is empty, and select any three buttons except for the power button. Within 8 seconds, press the specified buttons in sequence with no 1-second delay; repeat the process two more times.
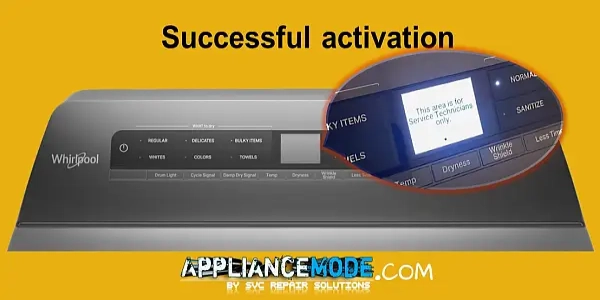
What is the signal that indicates a successful activation of the service diagnostic mode?
Upon successful activation of the Service Diagnostic Mode, the LCD screen will display “This area is for service technicians only.”
What should I do after activating the service diagnostic mode?
Follow the on-screen instructions for navigating within and throughout the service mode.
How can I enter test mode?
Simply press the ‘NORMAL’ button located on the upper right corner of the display. This will allow you to access the various test cycles available in the SDM.
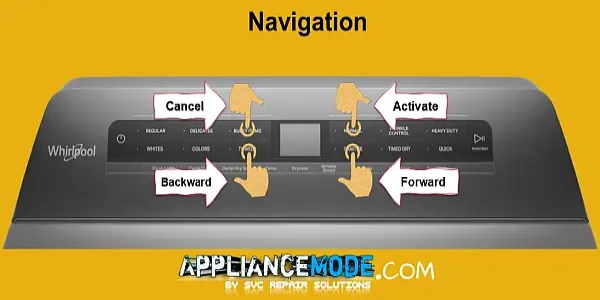
How can I navigate through service diagnostic mode?
Use the ‘SANITIZE’ and ‘TOWELS’ buttons to select or skip test cycles. Once you have reached the desired test, press ‘NORMAL’ to activate the cycle. To return to the previous test or cancel the cycle, use the ‘BULKY ITEMS’ button.
Service diagnostic mode function:
| Test mode | Function behavior |
|---|---|
| Factory diagnostics: | We do not use this function in the field. |
| System information: | We do not use this function in the field. |
| Fault history: | 1. Fault history refers to a record of all the past malfunctions or errors that the appliance has experienced. 2. Clearing fault history involves erasing the log of past faults or errors that have been recorded by a main board |
| Service diagnostics: | 1: HMI Test: User interface checking, which includes testing each of the following: – Buttons. – LEDs. – Display. – Sound. 2: Component activation refers to being operated in a mode that forces a specific component, such as the drive motor or heating element. This mode is used for testing purposes to determine the performance of the component under specific conditions. For example, if there is an issue with the heating element in a dryer, a technician may use the forced run to operate the element to achieve a specific temperature or for a specific duration in order to diagnose the problem. Improper use of C.A. can potentially cause damage to the dryer or create safety hazards. 3: Sensor Feedback: sensors are checked, which includes testing each of the following: door switch. moisture sensor. hot thermistor. front thermistor. 4: Diagnostic Cycle: Phase Test Cycle, which includes testing each of the following: – Drying. – Cooldown. – Sensing. 5: Demo Mode: Showroom function 6: Exit Service Mode |
What is the process to exit from service diagnostic mode?
To exit the service mode, there are two options available. Firstly, you can navigate to the ‘Exit Service Mode’ script from the service diagnostics function. Alternatively, you can repeatedly press the ‘BULKY ITEMS’ button until the appliance returns to customer operation mode.
Final Thought
Whirlpool dryer error codes help diagnose issues in heating systems, airflow, moisture detection, motor operation, and electronic control systems. While many problems can be fixed with simple maintenance like cleaning vents and filters, persistent error codes often indicate failing sensors, relays, or control boards that require professional repair.

I am a master appliance repair technician with over 35 years of experience in the field. I am passionate about helping people troubleshoot their appliances and fix common problems. My website, appliancemode.com, provides a wealth of information on troubleshooting common appliance issues and deciphering error codes. This website aims to empower people to tackle appliance repairs themselves and save money on service calls.